Power: Difference between revisions
imported>KindaNice |
imported>KindaNice |
||
| Line 248: | Line 248: | ||
* [[Simple_double-loop_TEG]] (outdated) | * [[Simple_double-loop_TEG]] (outdated) | ||
* [[Setting up the mix chamber]] (outdated) | * [[Setting up the mix chamber]] (outdated) | ||
* https://forum.spacestation14.com/t/teg-general-setup-theory-information-tips-and-a-diagram/21934 | |||
=== Radioisotope Thermoelectric Generators (RTGs) === | === Radioisotope Thermoelectric Generators (RTGs) === | ||
Revision as of 19:06, 15 September 2025
The Station Engineers' primary task is to generate electric power generation methods (excluding the TEG and Supermatter Crystal, which must be set up by Atmospheric Technicians or the Chief Engineer), which is essential for keeping a well-functioning space station from descending into darkness. Most computers, machines, and lighting fixtures require power to operate, among others.
Supply and Demand

Running an efficient power operation is about delicately balancing the supply of power from generators with demand from station equipment. Thanks to cutting-edge energy storage technology (SMES, and batteries in substations and APCs) aboard NanoTransen stations, generators do not have to always match instantaneous station demand; it is enough to generate enough power to meet the average station demand.
Use the Power Monitoring Console to determine the station's power demand. In a well-functioning station, SMES balance the instantaneous demand with supply. Don't let them run out!
If long term demand exceeds supply, you will have angry station inhabitants complaining about lack of power. When supply exceeds demand, the extra power is used to charge energy storage devices. When all energy storage devices are full, the excess power is safely dissipated into space.
It is better to be in a long-term energy surplus than an energy deficit. On the other hand, if your station is powered by non-renewable sources like the Anti-Matter Engine (AME), generating much more power than you need wastes fuel and contributes to space warming, not to mention, wastes cargo's money which they would have wasted on a lasers crate anyway.
The Power Hierarchy


Power transmission in SS14 comes in three different flavors, high voltage (HV) cables (orange), medium voltage (MV) cables (yellow) and low voltage (LV) cables (green).
Power flows from generators and power storage via HV cables to substations around the station. From substations, MV cables going out transmit power from the substation and connected grid to area power controllers (APCs) where LV cables take the power the rest of the way to consumers (3-4 tile radius from the APC to devices in the area). A cable must be placed under generators, storage, substations and APCs for them to function.
Separating your Grid
One device not mentioned so far is the cable terminal. In order to separate part of your power network you will need to use a cable terminal, with a HV cable on the terminal box side and the wire side facing towards a SMES. Note the cable terminal will act as a separator for HV cable, if two HV cables are right next to each other and a connecter is placed upon them it will separate those two cables. When a HV cable is then placed under the SMES this creates two distinct HV cable networks; the side with your generation on which ends at the cable terminal, and the storage / supply side which starts at the SMES and goes out to substations.
Currently if you place a substation on the generation side of your SMES it will drain into said SMES as a supplier. This is important as in this scenario if there isn't enough generation, the substation will drain to empty causing a blackout in its connected APCs while everything on the SMES side will remain powered.
Power Generation Methods
Temporary Power Generation
Small Portable Generators
The simplest and most basic of all generators on this list are the "P.A.C.M.A.N." line of portable generators. The J.R.P.A.C.M.A.N. can be found in maintenance areas, and runs on simple welding fuel, also found in maintenance. Anchor it to an Template:Item icon and power it up. Because it generates LV power, it is only able to power one APC's worth of devices. It also generates exhaust fumes, so make sure you set it up in a well-ventilated area.
The other "P.A.C.M.A.N." generators are intended for usage by engineering for advanced power scenarios. Bootstrapping the engine, powering departments, and so on. unlike the J.R.P.A.C.M.A.N., They connect directly to Template:Item icon or Template:Item icon power cables, and are able to switch between them for flexibility. the standard P.A.C.M.A.N. is powered by solid plasma, and the S.U.P.E.R.P.A.C.M.A.N. runs on uranium, and produces enough power for things like shuttles.
The Antimatter Engine
The Antimatter Engine (AME) is not always the main source of power for most stations. However, the AME should be your temporary fix in order to keep the station powered until you can get one or more engines up (TEG, Tesla, Singularity, Solars). Engineering is responsible for setting up the AME at round start.
Setup
- Grab AME parts from a Packaged antimatter reactor crate and place one on each floor tile you want a piece of the reactor. The minimum is a 3×3 square, which gives one core.
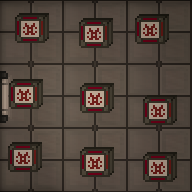
3×3, 1-core AME - With a multitool in hand, click the AME parts on the floor to build a piece of the reactor. If you mess up, you can deconstruct a built reactor with a lit welder.
- Open the antimatter control unit crate to obtain an AME Controller. Place it next to the reactor you just built and wrench it down. The HV cable underneath the controller will carry power produced from the AME. Make sure the controller is on HV wire.
- Open the antimatter containment jar crate to obtain antimatter containment jars. This is the fuel for the AME. With it in hand, click on the controller to place it in the AME. Change the Injection Amount to the desired level (see table below) and click Toggle Injection to turn the AME on.
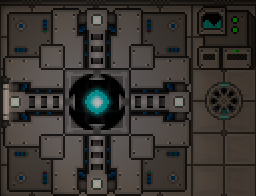
Finished AME


The wattage produced by the AME in different configurations is shown below. The color indicates the state - green: safe, yellow: Overloaded (explodes eventually), Orange: Heavily Overloaded (explodes soon), Red: Extremely Overloaded (explodes within the minute)
| Cores | |||||||||||
|---|---|---|---|---|---|---|---|---|---|---|---|
| 1 | 2 | 3 | 4 | 5 | 6 | 7 | 8 | 9 | 10 | ||
| Injection | 2 | 80.0 | 40.0 | 26.7 | 20.0 | 16.0 | 13.3 | 11.4 | 10.0 | 8.9 | 8.0 |
| 4 | 320.0 | 160.0 | 106.7 | 80.0 | 64.0 | 53.3 | 45.7 | 40.0 | 35.6 | 32.0 | |
| 6 | 720.0 | 360.0 | 240.0 | 180.0 | 144.0 | 120.0 | 102.9 | 90.0 | 80.0 | 72.0 | |
| 8 | 1,280.0 | 640.0 | 426.7 | 320.0 | 256.0 | 213.3 | 182.9 | 160.0 | 142.2 | 128.0 | |
| 10 | 2,000.0 | 1,000.0 | 666.7 | 500.0 | 400.0 | 333.3 | 285.7 | 250.0 | 222.2 | 200.0 | |
| 12 | 2,880.0 | 1,440.0 | 960.0 | 720.0 | 576.0 | 480.0 | 411.4 | 360.0 | 320.0 | 288.0 | |
| 14 | 3,920.0 | 1,960.0 | 1,306.7 | 980.0 | 784.0 | 653.3 | 560.0 | 490.0 | 435.6 | 392.0 | |
| 16 | 5,120.0 | 2,560.0 | 1,706.7 | 1,280.0 | 1,024.0 | 853.3 | 731.4 | 640.0 | 568.9 | 512.0 | |
| 18 | 6,480.0 | 3,240.0 | 2,160.0 | 1,620.0 | 1,296.0 | 1,080.0 | 925.7 | 810.0 | 720.0 | 648.0 | |
| 20 | 8,000.0 | 4,000.0 | 2,666.7 | 2,000.0 | 1,600.0 | 1,333.3 | 1,142.9 | 1,000.0 | 888.9 | 800.0 | |
| 22 | 9,680.0 | 4,840.0 | 3,226.7 | 2,420.0 | 1,936.0 | 1,613.3 | 1,382.9 | 1,210.0 | 1,075.6 | 968.0 | |
Maintenance
The AME will stop generating power when its fuel has been used up. It is wise to periodically check on the AME to make sure it is not out of fuel. If the fuel runs out, you must refuel it:
- Make sure injection is off.
- Eject the existing fuel jar from the AME.
- Place a new fuel jar into the AME.
- Turn the AME back on.
It is also wise to periodically check on the AME, since it is a prime target for sabatoge.
You can see if the AME is currently overloaded (and thus taking damage), if the cores glow in a "+"-shape instead of a ball.
The display of the AME controller indicates if the AME has suffered internal damage. If it is blue, at least 50% of the internal shielding is remaining. If the display shows a red wave, it is below 50%. If the display starts showing swear words, the AME is about to explode.
Basic Permanent Power
Solar Power
Solar power is a passive means of generating power. A solar array is made up of a number of solar panels, a single solar tracker device and a solar control computer (console) nearby to properly control and manage the panels.
Most if not all solar arrays start off not connected to the station, and need to be connected via HV cables underneath each panel and connected back to the station. Once connected, use the solar control computer to change the angle and speed of tracking for the panels as shown below:


Notice the graph on the right has a T shaped white line and a yellow / golden line. The aim is to alter the panel angle (white T line) to match the sun angle (yellow line). Some experimentation might be needed to setup the angular velocity correctly so that the lines stay in sync and generate maximum wattage. Note: a general start for the angular velocity is somewhere around 5-6 degrees per minute.
A typical panel near max output will produce 1500W (1.5kW). This would be enough to power roughly 1 machine and 1 computer (this figure may change as balance changes are made).
Solar panels can be ordered through Cargo by crates. One crate will contain **six** solar assembly flatpacks. A flatpack is unpacked using a multitool, which produces an already mounted solar assembly. 2 pieces of glass then need to be added to complete the solar panel.
A solar tracker device is made using a solar assembly flatpack as well, so don't forget to count in an extra one. It's made by unpacking a solar assembly from a flatpack, putting a solar tracker electronics inside the solar assembly and then adding 2 pieces of glass.
The Thermoelectric Generator (TEG)
The TEG involves atmospherics, and atmos are usually responsible for setup unlike most other power sources. The TEG produces electric power from a temperature exchange between hot and cold gases, with a side effect of cooling the hotter gas and heating the colder one. To produce the most power, the temperature difference between the hot and cold loops should be more than about Template:Tooltip<ref>https://github.com/space-wizards/space-station-14/blob/master/Content.Server/Power/Generation/Teg/TegSystem.cs#L169</ref>. This tranfer only occurs when gases in both loops are flowing, so if pumps in the hot loop become pressure-locked then the TEG stops producing power.
There is no single correct way to set up a TEG (and the available layouts are different across all stations). Here are guides on setting up the TEG:
- Simple_double-loop_TEG (outdated)
- Setting up the mix chamber (outdated)
- https://forum.spacestation14.com/t/teg-general-setup-theory-information-tips-and-a-diagram/21934
Radioisotope Thermoelectric Generators (RTGs)


Making power using an RTG is similar to making power using solar. RTGs only provide 10 kW<ref>https://github.com/space-wizards/space-station-14/blob/6e91190478ec03e038ff1c3a10ecd632808f281e/Resources/Prototypes/Entities/Structures/Power/Generation/generators.yml#L239</ref> of power, but they provide it for free and for the entire round. Basically, if you connect an RTG to your power grid, it'll give you free power. Sometimes, RTGs are damaged. Damaged RTGs<ref>https://github.com/space-wizards/space-station-14/blob/6e91190478ec03e038ff1c3a10ecd632808f281e/Resources/Prototypes/Entities/Structures/Power/Generation/generators.yml#L275-L318</ref> behave just like regular ones, but they're radioactive.
Radioactive Radioisotope Thermoelectric Generator (RRTG) Setup
You can use the radioactive nature of the RTG to your advantage. Lord Singuloth generates power by emitting radiation into radiation collectors. Likewise, you can surround an RRTG in radiation collectors and generate as much as ~200-300KW with one RRTG.
Supermatter Crystal
Description TBD, here's the project where this was introduced: https://github.com/space-wizards/space-station-14/pull/29244
Containment-based Engines
Gravitational Singularity Engine
The Gravitational Singularity Engine is one of the most well known and potentially dangerous ways of generating power in Space Station 14. To build it, you need a particle accelerator and singulator generator to spawn a singularity, containment field generators to trap it in a tiny box so it doesn't kill everyone, emitters to power the containment field generators, and radiation collectors to turn the radiation the singularity generates into sweet, sweet power.
If someone turns off the containment field, the singularity will escape and everyone will die. If someone turns the particle accelerator up too much for too long, the singularity will get too big, escape, and then everyone will die. If you get hit by emitter beams, they'll hurt you real bad, and you might die. The singularity engine is super deadly - but damn if it doesn't give the station lots of power.
To keep the singularity from breaking containment, set the particle accelerator to 1. At this setting it will eventually die out. Any more than that and it'll slowly (or quickly) grow until it escapes. Turning it up to higher numbers is OK for short bursts just to kickstart the engine, though - but be careful.
The largest size singularity before you risk it breaking loose can generate between 1.4 and 1.6 MW with 24 radiation collectors. The amount of power the singularity engine generates changes from station to station, because the layout of the engine is different on different stations. One source of the variance is the location of the radiation collectors on each station. Radiation falls off over distance, so on stations where the radiation collectors are further away, you'll get less power.
Radiation collectors require plasma gas to run. If your singularity isn't giving you any power, make sure that your radiation collectors are on and contain tanks full of plasma.
A tell-tale sign of the singularity's proximity is the gravitational lensing effect; the closer you are, the stronger the distortion.
As stated before, the singularity is an incredible powerful resource, equally deadly and beautiful, and in the wrong right hands, an unpredictable tool of chaos: a traitor seeking to force an evacuation, or die a glorious death may find it useful to leave the particle accelerator on the 2 setting or higher in order to swell the singularity past containment. As one might expect, it is typically a good idea to make sure you clear a wide distance from the
DISCLAIMER: It is generally inadvisable to intentionally loose the singularity as a non-antag without good reason. Be prepared to get robusted, lynched and/or banned if you set it loose for shits and giggles.
Tesla Generator
TBD